Plasma cutting is a highly efficient metal fabrication process, but achieving precision cuts requires proper setup and control of key components. One of the most critical aspects of plasma cutting is torch height control, which ensures optimal arc distance for clean, consistent cuts. Alongside this, a correct plasma cutter setup is essential to maximize performance and extend the life of consumables. For CNC operators, understanding the THC screen set Mach3 interface is crucial for fine-tuning automated cutting processes. Finally, performing a torch height control test ensures that your system is calibrated correctly before starting a job.
In this guide, we will explore each of these topics in depth, answering key questions to help you optimize your plasma cutting operations. Whether you’re a beginner or an experienced operator, mastering these elements will lead to better cut quality, reduced waste, and improved efficiency. Let’s dive into the essential aspects of torch height control, plasma cutter configuration, Mach3 THC settings, and testing procedures.
Understanding Torch Height Control in Plasma Cutting Systems
Torch height control (THC) plays a fundamental role in plasma cutting by dynamically adjusting the distance between the torch tip and the workpiece during operation. This automated regulation of arc gap distance serves as the foundation for achieving clean cuts, maximizing consumable lifespan, and preventing equipment damage. But what exactly makes torch height control so indispensable in modern plasma cutting applications?
The Mechanics Behind Torch Height Control
Modern torch height control systems rely on sophisticated feedback mechanisms to maintain optimal cutting conditions. Using either voltage monitoring or capacitive sensing technology, the THC continuously evaluates the arc characteristics and makes real-time adjustments to the torch position. This becomes particularly crucial when cutting warped or uneven materials where manual height adjustment would be impractical. The system’s intelligence lies in its ability to distinguish between the initial pierce height and subsequent cut height, applying different parameters for each phase of the cutting process.
At the core of an effective torch height control system are several integrated components working in harmony. Voltage feedback provides the primary input for height determination, while a precisely calibrated Z-axis drive system executes the necessary positional corrections. Advanced systems may incorporate additional sensors to compensate for material irregularities or surface contaminants that could otherwise interfere with height detection.
The Critical Importance of Proper Height Control
The significance of maintaining proper torch height becomes apparent when examining its impact on cut quality and operational efficiency. When the torch operates too close to the material, it risks creating excessive dross and premature nozzle failure. Conversely, excessive standoff distance leads to arc instability and incomplete penetration. Proper torch height control eliminates these variables by maintaining the ideal arc length throughout the cutting process.
Beyond ensuring cut quality, effective torch height control directly influences equipment longevity and operational costs. The system’s ability to prevent torch crashes protects expensive components from impact damage, while optimized arc distance minimizes unnecessary wear on consumables. This becomes especially valuable in high-production environments where even marginal improvements in consumable life translate to significant cost savings over time.
Navigating Common THC Operational Challenges
While modern torch height control systems are remarkably reliable, operators must remain vigilant about potential performance issues. Voltage feedback accuracy can be compromised by worn consumables or contaminated material surfaces, leading to suboptimal height adjustments. Some systems may exhibit response lag if their sensitivity parameters aren’t properly matched to the cutting conditions. Material characteristics such as scale, rust, or primer coatings can occasionally interfere with height sensing accuracy, requiring operator intervention or system recalibration.
Addressing these challenges begins with understanding the relationship between torch height control and other system parameters. Subsequent chapters will explore how to integrate THC with Mach3 control software, optimize plasma cutter setup parameters, and validate system performance through comprehensive torch height control tests. By developing this comprehensive understanding, operators can unlock the full potential of their plasma cutting systems while minimizing downtime and maintenance requirements.
The foundation laid by proper torch height control sets the stage for examining the broader system configuration, which we’ll explore in detail in our next chapter covering plasma cutter setup essentials.
How to Properly Configure Your Plasma Cutter Setup for Optimal Performance
Achieving precision cuts with a plasma cutting system begins long before the torch touches metal—it starts with a carefully calibrated plasma cutter setup. Proper configuration affects everything from cut quality and speed to consumable life and operational safety. But what exactly goes into an optimal plasma cutter setup, and how can operators ensure their machine is tuned for peak performance?
The Fundamentals of Plasma Cutter Configuration
A proper plasma cutter setup requires attention to both electrical and mechanical parameters. The power source must be matched to material thickness, with amperage settings carefully selected to provide enough heat for clean cuts without excessive energy that leads to nozzle erosion. Gas selection plays an equally critical role, whether using air, oxygen, nitrogen, or specialty gas mixtures, with pressure regulators requiring precise adjustment to maintain consistent flow rates.
The mechanical aspects of plasma cutter setup involve torch alignment and consumable inspection. Even minor misalignment can cause angled cuts or uneven wear patterns, while worn electrodes or nozzles dramatically affect arc stability. Travel speed must be synchronized with power settings—too fast results in incomplete cuts, while too slow wastes energy and creates excessive heat-affected zones. Modern systems often include preset configurations for common materials, but experienced operators know these serve only as starting points for fine-tuning.
Critical Parameters That Define Cutting Performance
Cut quality hinges on several interdependent variables in the plasma cutter setup. Pierce height, typically set higher than cut height, prevents splashback damage during initial penetration. Pierce delay time must be sufficient for complete material penetration but not so long that it unnecessarily wears consumables. Cut height, usually maintained between 1.5-3mm for most applications, requires strict adherence for consistent results, particularly when dealing with warped or uneven stock.
Voltage becomes a key indicator of proper plasma cutter setup, with many systems using arc voltage to automatically maintain standoff distance through torch height control systems. The relationship between voltage, amperage, and travel speed forms the “cut triangle” that experienced operators manipulate to optimize for different materials and desired edge quality. Post-flow gas timing, often overlooked, deserves careful adjustment as insufficient cooling leads to premature consumable failure while excessive post-flow wastes gas.
Troubleshooting Common Setup Challenges
Even with meticulous plasma cutter setup, operators encounter various performance issues that require diagnostic skills. Excessive dross may indicate incorrect travel speed or inadequate power, while angled kerf suggests torch misalignment or worn consumables. Unstable arcs often point to gas flow problems or incorrect pressure settings. The most skilled operators develop systematic approaches to isolating variables—methodically checking ground connections, gas purity, and consumable condition before adjusting electrical parameters.
Modern systems with automated torch height control add complexity to setup procedures. While these systems compensate for material variations, they require proper initial configuration to function effectively. Operators must ensure height control sensors are calibrated and that voltage thresholds match the material being cut. Integration with CNC controls, particularly when using systems like the THC screen set Mach3, introduces additional parameters that affect overall performance.
The time invested in perfecting plasma cutter setup pays dividends in reduced scrap, longer consumable life, and more efficient production. In our next chapter, we’ll examine how to leverage these foundation settings when configuring the THC screen set Mach3 for computer-controlled cutting operations.
Mastering the THC Screen Set in Mach3 for Precision Plasma Cutting
The THC screen set Mach3 serves as the critical interface between your plasma cutter and CNC controls, translating raw machine commands into precise torch movements. This sophisticated software module transforms a standard Mach3 installation into a fully-featured plasma cutting control system, but what exactly makes the THC screen set Mach3 so indispensable, and how can operators harness its full potential?
Navigating the THC Screen Set Interface
At first glance, the THC screen set Mach3 presents operators with an array of specialized controls that go beyond standard CNC machining functions. The interface consolidates all plasma-specific parameters into logical groupings, with dedicated sections for pierce sequences, cut profiles, and height control configurations. Central to its operation is the real-time voltage display, which serves as the primary feedback mechanism for the torch height control system.
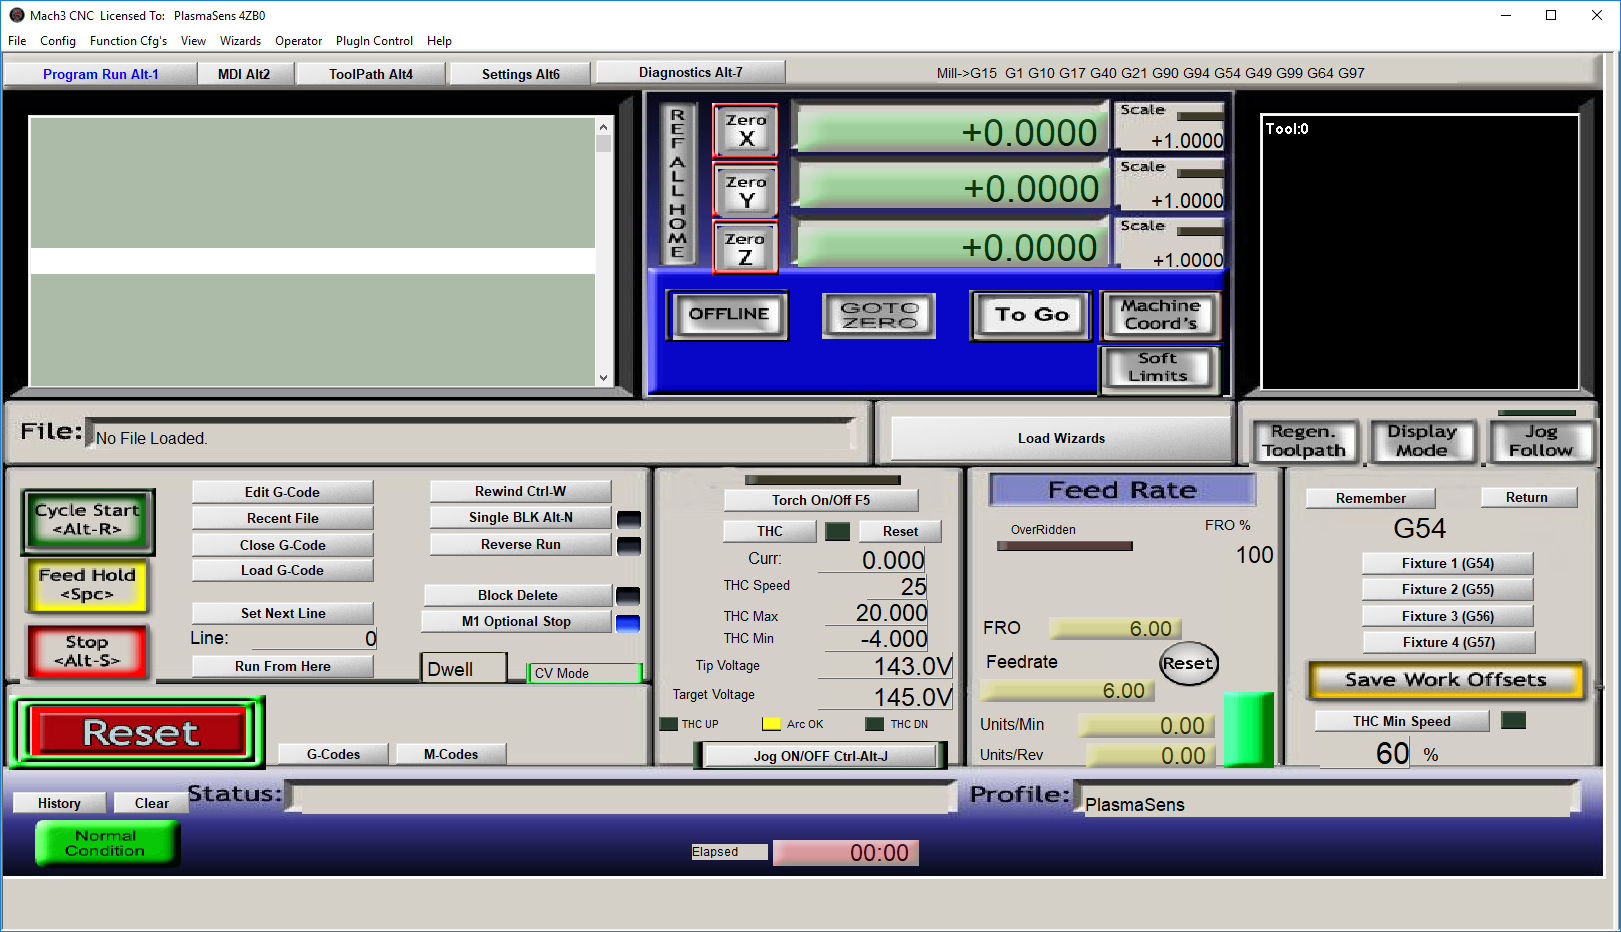
The screen set’s design emphasizes workflow efficiency, placing the most frequently adjusted parameters—such as cut height, pierce delay, and THC sensitivity—within immediate reach. Advanced users will appreciate the depth of customization available, with configurable hotkeys and macros that can streamline complex cutting operations. The THC screen set Mach3 also provides visual indicators for critical system states, including arc transfer confirmation and fault conditions, allowing operators to monitor process health at a glance.
Configuring THC Parameters for Optimal Performance
Proper setup of the THC screen set Mach3 begins with establishing baseline voltage thresholds that correspond to ideal cut height. These values vary significantly based on material type, thickness, and plasma system characteristics, requiring operators to maintain detailed setup records for different applications. The software’s voltage scaling feature allows fine-tuning of the height control response, with separate adjustments available for upward and downward movements to prevent hunting behavior.
The pierce sequence configuration deserves particular attention within the THC screen set Mach3. Operators must carefully coordinate the timing between plasma ignition, initial height positioning, and motion commencement to prevent consumable damage. The software’s ability to implement material-specific pierce routines—with customizable height, duration, and plunge rates—proves invaluable when working with varied stock thicknesses.
Advanced features like corner anti-dive and arc good delay settings demonstrate the sophistication of the THC screen set Mach3. These parameters help maintain cut quality during direction changes and momentary arc fluctuations, respectively. The software’s ability to interface with external devices—such as relay-controlled gas consoles or automatic consumable changers—further expands its capabilities in production environments.
Troubleshooting and Optimizing THC Operation
Even with proper configuration, operators may encounter situations where the THC screen set Mach3 requires adjustment or intervention. Common issues include overactive height correction during thin material cutting, where the system may benefit from reduced sensitivity settings. Conversely, thick materials or bevel cuts often demand more aggressive THC response to maintain consistent arc voltage.
The software’s diagnostic tools become crucial when investigating performance anomalies. The voltage graphing feature allows operators to visualize arc stability over time, revealing issues that might otherwise go unnoticed. Event logging provides a chronological record of system actions, invaluable for post-process analysis of cutting problems.
Integration with other system components represents another consideration when working with the THC screen set Mach3. Proper synchronization between the plasma power source, motion control, and height sensing hardware ensures seamless operation. Many experienced operators develop custom macros that tie these elements together, creating optimized workflows for their specific applications.
Mastering the THC screen set Mach3 represents a significant step toward achieving production-grade plasma cutting results. In our next chapter, we’ll put these configurations to the test through comprehensive torch height control test procedures that validate system performance.
Maximizing CNC Efficiency with PoKeys57CNC and Mach4 Probing Solutions
Conducting a Torch Height Control Test for System Validation
A comprehensive torch height control test serves as the ultimate diagnostic for your plasma cutting system’s performance. Much like a flight check before takeoff, this evaluation verifies that all components – from voltage sensing to Z-axis response – work in perfect harmony. But what specific insights can operators gain from a properly executed torch height control test, and how does it differ from routine operational checks?
Structured Approach to THC Testing
The most effective torch height control test follows a graduated methodology, beginning with static validations before progressing to dynamic cutting scenarios. Initial tests should verify the system’s ability to maintain position during simulated cuts on known flat material, using a dial indicator to measure positional drift over extended durations. This baseline assessment reveals fundamental issues with servo response or voltage interpretation before introducing real-world variables.
As testing progresses, operators introduce material variations that mimic production conditions. Purposefully warped test pieces prove particularly valuable for evaluating the system’s response to surface irregularities. The torch height control test should document both response time and positional accuracy when encountering these obstacles, with successful systems demonstrating smooth transitions without overshoot or oscillation.
Interpreting Test Results for System Optimization
The data gathered during a torch height control test provides actionable intelligence for fine-tuning system parameters. Voltage deviation patterns, for instance, might indicate the need for recalibration of the arc voltage sensing circuit. Response lag during direction changes could suggest adjustments to the THC’s acceleration parameters in the control software.
Advanced testing protocols incorporate multiple material thicknesses and cutting speeds to develop a comprehensive performance profile. This approach helps identify the system’s operational sweet spots while revealing edge cases that may require manual intervention during production. Documenting these parameters creates a valuable reference for future troubleshooting and process optimization.
Implementing Continuous Testing Protocols
Rather than treating it as a one-time event, savvy operators integrate the torch height control test into regular maintenance schedules. Periodic testing catches component degradation before it affects cut quality, whether from worn consumables, loosening mechanical connections, or sensor drift. This proactive approach proves particularly valuable in high-volume operations where unscheduled downtime carries significant costs.
Modern systems often include automated testing routines within their software, but manual verification remains essential. Combining automated diagnostics with hands-on validation creates a robust quality assurance process that maintains peak system performance over time. The most successful operations treat THC testing not as an interruption to production, but as an investment in consistent quality and efficiency.
Precision Plasma: The THC Setup Guide
Innovations in CNC Automation: PoStep25-256 and the Technologies That Make It Shine
Maximizing Efficiency in CNC Plasma Cutting: A Step-by-Step Guide to Setup and Control
Mastering the Art of Precision Plasma Cutting
Throughout this guide, we’ve explored the critical elements that define a high-performance plasma cutting system—torch height control, plasma cutter setup, THC screen set Mach3, and torch height control test. Each of these components plays a vital role in ensuring clean cuts, extended consumable life, and operational efficiency.
Proper torch height control maintains the ideal arc gap, preventing crashes and optimizing cut quality. A well-tuned plasma cutter setup ensures that power, gas flow, and travel speed are perfectly balanced for the material at hand. The THC screen set Mach3 provides the digital interface needed to fine-tune automated cutting processes, while regular torch height control tests validate system accuracy and reliability.
By integrating these practices into your workflow, you can achieve consistent, high-quality results while minimizing downtime and waste. Whether you’re a hobbyist or a production professional, mastering these fundamentals will elevate your plasma cutting capabilities.
Now that you understand the theory, it’s time to put this knowledge into action. Fine-tune your settings, run diagnostic tests, and refine your techniques—because in plasma cutting, precision isn’t just an option; it’s the standard.